Do you want to install Windows XP from a USB drive? It’s very simple. Follow our easy steps. Let’s get started!
Why Use a USB Drive?
USB drives are handy. They are small and portable. You can install Windows XP on any computer with a USB port. CD drives are becoming rare. USB is the future.
What You Need
- Windows XP ISO file
- USB drive (at least 4 GB)
- Rufus software
- Computer with USB port
Credit: techgage.com
Step 1: Download the Windows XP ISO File
First, get the Windows XP ISO file. You can find it on the internet. Make sure it is a legal copy. Save the file on your computer.
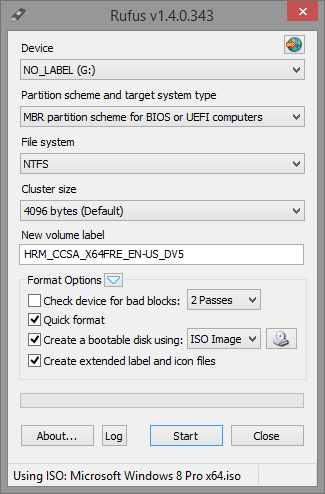
Step 2: Download and Install Rufus
Next, download Rufus. Rufus is a free tool. It helps create bootable USB drives. Go to the Rufus website and download the latest version. Install it on your computer.
Credit: www.youtube.com
Step 3: Prepare the USB Drive
Insert the USB drive into your computer. Open Rufus. You will see the USB drive listed in Rufus. Make sure to select it.
Step 4: Create Bootable USB Drive
In Rufus, click the ‘Select’ button. Find and select the Windows XP ISO file. Rufus will show the file name. Now, click ‘Start’. Rufus will create the bootable USB drive. This process may take some time. Be patient.
Step 5: Boot from USB Drive
Once Rufus is done, your USB drive is ready. Restart your computer. Enter the BIOS setup. This is usually done by pressing a key like F2, F12, or DEL during startup. Look for the ‘Boot’ menu. Set your USB drive as the first boot device. Save changes and exit BIOS. Your computer will restart and boot from the USB drive.
Step 6: Install Windows XP
Follow the instructions on the screen. The Windows XP setup will start. Choose your language and settings. Accept the license agreement. Select the partition where you want to install Windows XP. Format the partition if needed. The installation will begin. This may take some time.
Step 7: Complete the Installation
After the installation, your computer will restart. Remove the USB drive. Windows XP will continue to set up. Follow the on-screen instructions. Enter your name and product key. Set the date and time. Finally, Windows XP will start. You have successfully installed Windows XP from a USB drive!
Troubleshooting
Sometimes, things do not go as planned. Here are some common problems and solutions:
Usb Drive Not Recognized
Try a different USB port. Make sure the USB drive is working. Check if it is listed in the BIOS setup.
Installation Freezes
Restart your computer. Try the installation again. Make sure the Windows XP ISO file is not corrupted. You may need to download it again.
Cannot Boot From Usb
Check the BIOS settings. Make sure the USB drive is the first boot device. Try using another USB drive.
Frequently Asked Questions
How Do I Install Windows Xp From A Usb?
You need a bootable USB drive with Windows XP files. Plug it in and restart your computer.
What Are The Requirements For A Bootable Usb?
You need a USB drive with at least 1GB space and Windows XP ISO files.
Can I Use Any Usb Drive For Windows Xp?
Yes, but it should have at least 1GB of free space.
How Do I Create A Bootable Usb For Windows Xp?
Use tools like Rufus or WinToFlash. They make the USB bootable.
Conclusion
Installing Windows XP from a USB drive is easy. Just follow these steps. Remember to be patient. Soon, you will have Windows XP on your computer. Happy installing!